Skip to search Skip to navigation menu Skip to main content Selecting option will reload page

Category: Kid's Arts and Crafts

Get Organized with Upcycled Plastic and Glass Bottles

glass_plastic_bottles
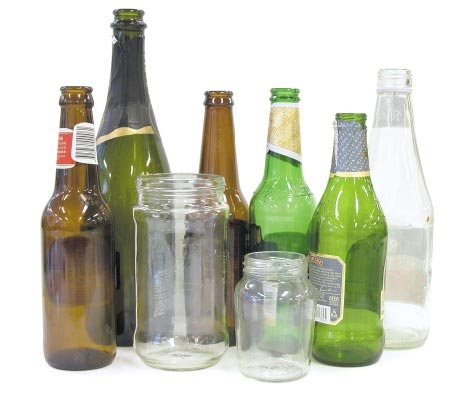
With spring well underway and Earth Day fast approaching, it’s the perfect time to focus on getting organized while embracing a more eco-friendly lifestyle. Our plastic bottle and glass jar crafts will not only breathe new life into the empties you’ve collected, they’ll also help keep your home’s surfaces free of accumulating clutter.

Refreshing Storage: Plastic Bottle Desk Organizers

While recycling plastic bottles is an environmentally sound alternative to pitching them, upcycling them for use in your home is even better. Coming up with creative alternative uses will allow you to reduce your carbon footprint even more by saving the energy used at the recycling plant.
glass_plastic_bottles2

Photo Credits: Craftzine

20-ounce soft drink bottles are the perfect size for creative desk organizers (see how nicely they line up on your desk?), and will serve double duty by nestling into car cup holders to keep lip balm, hair bands, crayons, and coins at the ready. To make, cut the bottom off of the bottle just below where the base begins to taper, and coat the surface with eco-friendly low or no VOC paint. Cover the sharp edge with a salvaged piece of felt, yarn, or ribbon.

A Pretty Place for Everything: Glass Jars

Upcycling glass jars is a cinch, and with so many shapes, sizes, and fun uses, it’s a great way to express your personal style while de-cluttering your home. Start by scavenging the fridge and pantry for near-empty jars. After washing and drying thoroughly, start flexing your creative muscles with these easy, inspired ideas:

Decorate jars with eco-friendly paints designed especially for glass, or dress them up with fabric, ribbon, or yarn.
glass_plastic_bottles3

Photo Credits: Design Sponge and from the book One More Skein

Snip the sleeves from a sweater that’s stained or beyond repair, then slip over glass jars and bottles with the finished wrist seam at the top. Wrap the cut edge under the base, and affix with tape or glue.

Got a favorite sweater that’s also been a beacon for moths? Unravel the yarn and use it to wrap a glass container that’s been slathered with glue. Then, add finishing touches, such as buttons, lace, and other embellishments salvaged from the sweater or other unusable garments.

Now that you’re inspired, see what other items you can rescue from your recycling bin. With a little creativity, staying organized may be easier and more affordable than you expected.

Continue Reading

Easy Dish Towel Apron for Children

childrens_dish_towel_apron
You can make a quick and easy dish towel apron for the little one in your life. This pattern is sooo easy and requires little materials. You could make this time in no time if you are in need of a simple gift; wrap it up, add some cookie cutters and little utensils and you are good to go! Now the little ones can wear a fun stylish apron just like mom! They could wear this during the holiday cooking and baking season when little hands are so eager to help. They could also use their dish towel apron for craft time. You could add pockets of different sizes so they can be filled with everything from markers and scissors to snacks. Photo Credits (above): So Bella Boutique

Things you need:
1 – Dish Towel (of your choice; two if you would like to add pockets and such)
Ribbon (that coordinates with the dish towel)

dish_towel_apron_pattern
Things to do:
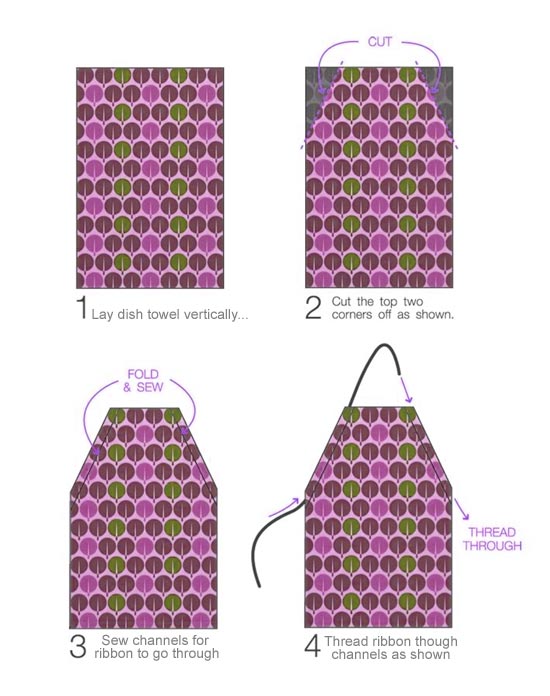
1. Lay your dish towel down vertically. Depending on the size of your little one, you may need to cut the towel in half horizontally. Lay your dish towel so the longest edges run horizontally and cut it vertically up the middle.
2. Cut the top two corners off but leave enough room so that you can later fold a bit over and create a channel for your ribbon to go through.
3. Next, if you know about folding and sewing hems, you can fold the cut edges of the corners under and press it with an iron. Then, fold the fabric and sew along the hem to create the channel.
Note: If you had to cut your dish towel in half, be sure to sew a hem on the cut side as well. Just watch that you don’t sew up the opening for the channel.
4. Cut your length of ribbon (this will take some trial and error to figure the perfect length you are wanting) and thread your ribbon up through one side of the dish towel apron and down through the other side to create a neck hole and two ties that reach around back. Since we thread the ribbon this way it makes the apron adjustable in size, so the little one could wear it from tot age until about 5-6 years of age, if not longer.
5. Finally, time to adorn your apron! You could cut up another dish towel to create pockets and sew them on. You could create one small pocket and center it toward the top or create a multi-pouched pocket along the bottom. You could also monogram initials with embroidery, add patches, sew/iron on a cute applique, or sew lace around the edges for a more dramatic look.

Continue Reading
Change Your Country
Please select your country, this will change the site to your country's currency:

Cancel