Skip to search Skip to navigation menu Skip to main content Selecting option will reload page

Create your own Haunted Woods

Shadows of a thousand years rise again unseen,
Voices whisper in the trees, “Tonight is Halloween!”
– – – Dexter Kozen
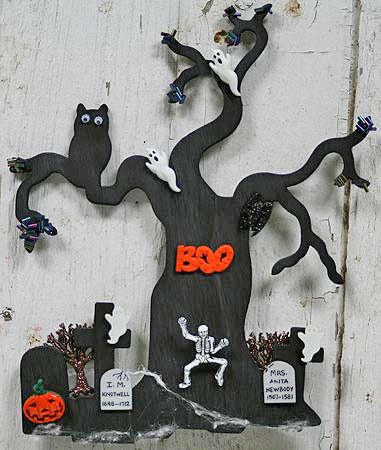
haunted_woods_blog
Create your own haunted woods. This would be an easy craft project for any child to make for the Halloween festivities. Be sure to supervise your child as the pieces in this project are tiny. Happy Haunting!

Materials Needed:
Weldbond Universal Glue
Black Wooden Silhouette Tree
“Haunted Woods” Halloween Buttons
Mixed Glass Tube Beads
3mm Googly Eyes
Tweezers
Small Cotton Ball

Instructions:
1. Take your Weldbond Universal glue and glue the button bushes from your “Haunted Woods” Halloween buttons mix on the back of the black wooden silhouette tree and let dry.
2. Again take your Weldbond Universal glue and glue the remaining “Haunted Woods” Halloween buttons on the black wooden silhouette tree anyway you would like and then let dry.
**Tip: Let the button hole of your “Haunted Woods” Halloween buttons rest against the side of the black wooden silhouette tree. Also, you can try holding each button for about 20 seconds after gluing.
3. Next, take your Weldbond Universal glue and drop a large drop of glue on the ends of the branches and then sprinkle your mixed glass tube beads onto the glue drops.
4. Place two small drops of Weldbond Universal glue onto the owl of the black wooden silhouette tree and use your tweezers to place the two 3mm googly eyes onto the owl.
5. Finally, take a small piece of your cotton ball and stretch it very thin. Take your Weldbond Universal glue and put a little glue on your finger. Rub the glue on the bottom of the black wooden silhouette tree. Then take the stretched out piece on cotton and place on the glue. And you have now completed your hauntingly scary wood silhouette!

You could also add some Halloween glitter for an even more haunting effect!

Continue Reading

How to Etch Pumpkins with Wood Carving Tools

halloween-pumpkins-paint-s3-medium_new

Photo Credit: Good Housekeeping

Pumpkins and gourds are essential for the fall season and make perfect decorations for any table or outdoor setting. Traditional carving and “degutting” of a pumpkin can sometimes be time consuming and messy. This step-by-step instructional video will show you how to create a new look with an old concept. For this etching pumpkin project you will need a nice sized pumpkin of your choice either orange or white, painter’s tape, black flat spray paint, regular white chalk and wood carving tools.
Instructions:
1. Take your pumpkin and cover the stem up with your painter’s tape.
2. Next, take your pumpkin outside and cover the entire pumpkin with a light layer of the black flat spray paint.
3. With your regular white chalk draw any design you wish on your now black painted pumpkin.
4. After you have drawn your design on your pumpkin, take your wood carving tools and start etching away! You can etch with your wood carving tools just on the surface to get the orange to show or you could etch deeper to get a paler yellow look. Instead of drawing a design on your pumpkin you could also etch using your wood carving tools just along the natural ridges of the pumpkin, creating a stripe design.
5. You can leave your now etched pumpkin as is or you can cut off the top of the pumpkin and hollow out the inside like you would for a traditional pumpkin. But this is no traditional pumpkin, instead, you place a vase that is the right size for that pumpkin and you now you have a pumpkin vase. You can also use this idea for silk florals if you don’t want to mess with real flowers. Instead of a vase you could use a green floral foam block and arrange your silk florals as you wish. Try playing with different colors of spray paint for a whole new look!

This video and any provided information are purely instructional. We are not liable from any events during the completion of the project, nor make any guarantees on the final state of the said project. This video is copyright of Meredith Corporation.

Continue Reading
Change Your Country
Please select your country, this will change the site to your country's currency:

Cancel