Skip to search Skip to navigation menu Skip to main content Selecting option will reload page

Category: General Crafts

Upcycling – Create a Lamp Basket with a Simple Lamp Kit

lamp_baskets
Things you need:
Basket Lamp Kit
Basket of your choice (must have handle for this specific kit)
Lamp Shade
Light Bulb

Things to do:
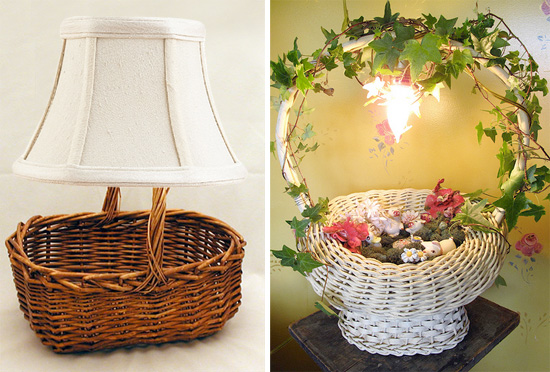
1. First, choose a basket with a sturdy handle. Installing the lamp section of this project is super simple! Since the socket is pre-assembled all you have to do is attach the socket onto the basket handle. Just slip the clap onto the middle of your basket handle and screw tightly. Attach the socket upright the handle so that you can later add a lampshade of your choice, or attach the socket upside on the handle for a more unique look.
2. Now, run the cord along the basket handle on one side of the basket and secure it down so that the cord does not hang down loosely. If you are filling the basket up, no need to worry about hiding the cord because it will not be seen like it would if it were empty.
3. Next, weigh your basket down with something heavy such as an unused book or something decorative and heavy so that your basket will not tip over once a bulb and lampshade (if you plan on using one) are placed on it.
4. Finally, decorate your basket or fill it up with pretty floral arrangements then top it off with a matching lampshade and you now have a unique decorative basket lamp!

Photo Credits: Flickr

Continue Reading

Easy Dish Towel Apron for Children

childrens_dish_towel_apron
You can make a quick and easy dish towel apron for the little one in your life. This pattern is sooo easy and requires little materials. You could make this time in no time if you are in need of a simple gift; wrap it up, add some cookie cutters and little utensils and you are good to go! Now the little ones can wear a fun stylish apron just like mom! They could wear this during the holiday cooking and baking season when little hands are so eager to help. They could also use their dish towel apron for craft time. You could add pockets of different sizes so they can be filled with everything from markers and scissors to snacks. Photo Credits (above): So Bella Boutique

Things you need:
1 – Dish Towel (of your choice; two if you would like to add pockets and such)
Ribbon (that coordinates with the dish towel)

dish_towel_apron_pattern
Things to do:
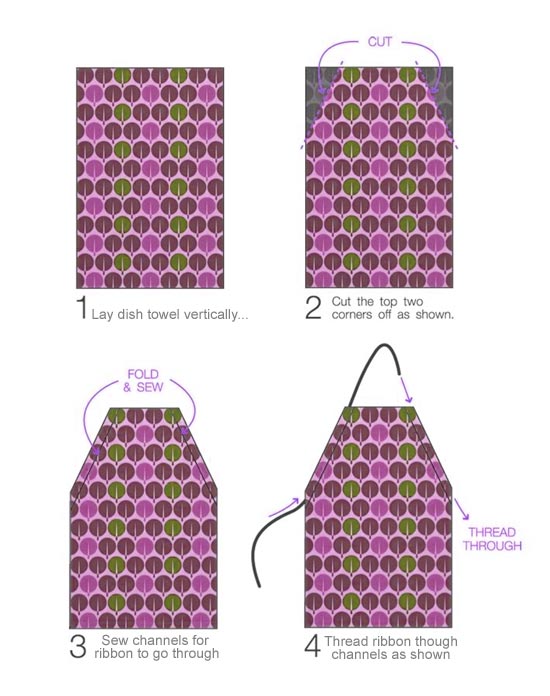
1. Lay your dish towel down vertically. Depending on the size of your little one, you may need to cut the towel in half horizontally. Lay your dish towel so the longest edges run horizontally and cut it vertically up the middle.
2. Cut the top two corners off but leave enough room so that you can later fold a bit over and create a channel for your ribbon to go through.
3. Next, if you know about folding and sewing hems, you can fold the cut edges of the corners under and press it with an iron. Then, fold the fabric and sew along the hem to create the channel.
Note: If you had to cut your dish towel in half, be sure to sew a hem on the cut side as well. Just watch that you don’t sew up the opening for the channel.
4. Cut your length of ribbon (this will take some trial and error to figure the perfect length you are wanting) and thread your ribbon up through one side of the dish towel apron and down through the other side to create a neck hole and two ties that reach around back. Since we thread the ribbon this way it makes the apron adjustable in size, so the little one could wear it from tot age until about 5-6 years of age, if not longer.
5. Finally, time to adorn your apron! You could cut up another dish towel to create pockets and sew them on. You could create one small pocket and center it toward the top or create a multi-pouched pocket along the bottom. You could also monogram initials with embroidery, add patches, sew/iron on a cute applique, or sew lace around the edges for a more dramatic look.

Continue Reading
Change Your Country
Please select your country, this will change the site to your country's currency:

Cancel